Asparagus Roll: Simple Vegetarian Sushi

Looking for a sushi recipe that’s both easy to make and packed with flavor? The asparagus roll is the perfect choice for a delicious appetizer, a light lunch, or even a fun addition to a homemade sushi night. Made with fresh asparagus spears, seasoned sushi rice, and nori, this simple yet elegant sushi roll is bursting with savory and slightly sweet flavors. It pairs beautifully with a drizzle of soy sauce, a sprinkle of sesame seeds, or even a touch of wasabi for an extra kick.

One of the best things about this asparagus roll is how beginner-friendly it is! Unlike more complex sushi rolls that require multiple ingredients and precise knife work, this one keeps it simple, making it a great recipe for anyone who wants to practice their sushi-rolling technique. All you need is a sushi rolling mat, a sharp knife, and a little patience to create perfectly rolled sushi at home.

The Asparagus Roll is Versatile

This sushi roll is incredibly versatile, making it a great option whether you’re serving it as an appetizer at a dinner party, a sushi rolling party, enjoying it as a quick snack, or pairing it with other sushi favorites for a full meal. You can even get creative by adding extra fillings like avocado, cucumber, or a light spread of cream cheese for a creamy contrast.

No matter how you customize it, this asparagus roll is guaranteed to impress with its delicious taste, fresh ingredients, and easy preparation. So grab your bowl of sushi rice, a rolling mat, and your favorite dipping sauces—it’s time to roll up something truly tasty!

A Perfect Sushi Roll for Vegans and Vegetarians

The Asparagus Roll is an excellent choice for both vegans and vegetarians who love sushi. If you are a Vegan or Vegetarian sushi lover, check out my Vegan Sushi Cook Book here! Unlike traditional sushi rolls that often contain seafood, this simple yet delicious roll is completely plant-based. Made with fresh asparagus spears, seasoned sushi rice, and nori, it delivers plenty of flavor and texture without the need for any animal products.

For added richness, some vegetarians like to include cream cheese or a sprinkle of grated Parmesan cheese, but if you’re strictly vegan, you can easily substitute with a dairy-free alternative or simply enjoy the roll in its purest form. A light dip in soy sauce enhances the flavor, while a touch of lemon juice or garlic can elevate the taste even more.

A healthier option with lower saturated fat

This roll is also a great option for those looking to reduce saturated fat while still enjoying a satisfying meal. Whether you’re making sushi for a dinner party or prepping a quick and healthy lunch, this recipe proves that plant-based sushi can be just as delicious as traditional options.

Want to make it even more exciting? Try adding some extra veggies like avocado, cucumber, or a sprinkle of sesame seeds to enhance the texture and flavor. No matter how you customize it, this asparagus roll is sure to be a favorite for anyone looking for a plant-based dish that’s both tasty and satisfying.

For this tutorial, you will need:

  • 1 Cup of Seasoned Sushi Rice (190 grams)

  • Half- cut sheets of Nori

  • Makisu (wrapped in cellophane, preferably)

  • 2-6 pieces Raw Asparagus

  • Sharp Knife

  • Cutting Board

  • Bowl of water (hand water, or Tezu)

  • Paper towels

  • Medium pot or sauce pan

  • Medium bowl

  • Ice

  • Tongs

    Cooking Asparagus

    Cooking asparagus is fairly simple and straightforward. When preparing asparagus for sushi, I like to blanch it and then dry the pieces. But before we get to blanching, be sure to cut the asparagus down to the same length as our half-cut sheet of nori.

    1. To blanch asparagus (or any other vegetable), bring a shallow pot or sauce pan of water to a boil.

    2. As the water is heating up, prepare an ice bath by dropping several pieces of ice into a large bowl and then filling it with cold water.

    3. Once the water has come to a boil, add the asparagus and boil it for 60-90 seconds. You should see the water turning slightly green and the asparagus should be soft enough to poke a fork into it with ease – this is a good way to test if the asparagus is done!

    4. Using a pair of tongs, grab the asparagus and place it into your ice bath.

    5. After the asparagus is cool to the touch, pull them out of the ice bath and place them on some paper towels and pat them dry. Your asparagus should be a bright green color!

    Making an Asparagus Roll

    I like to make the asparagus roll as a hosomaki (skinny roll). Since there aren’t many ingredients in this roll, it makes for great practice!

    1. Add a small handful of rice to the rough side of the nori, making sure to leave roughly 1cm of nori exposed towards the top.
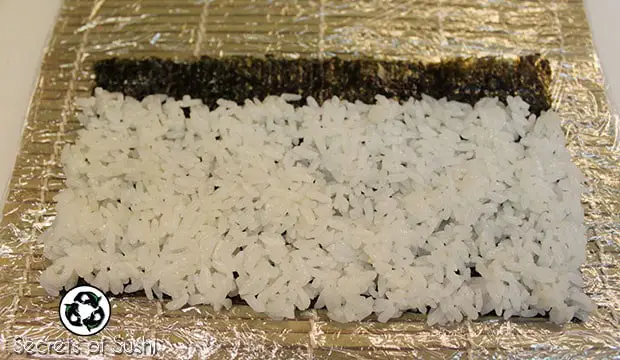
    Rice for a hosomaki

    You want to make sure the rice is evenly spread across the nori and that there is a bit of space in between the grains of rice. 

    2. Slice your asparagus in half, lengthwise.
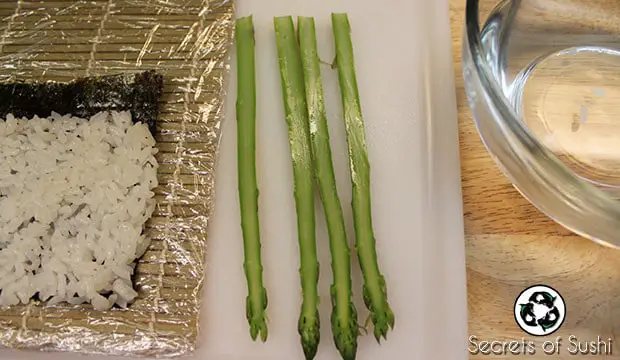
    sliced asparagus for sushi

    3. Place two halves in the center of the rice. I like to slice the asparagus in half and lay them out like this because it helps keep a consistent amount of our main ingredient throughout the roll.
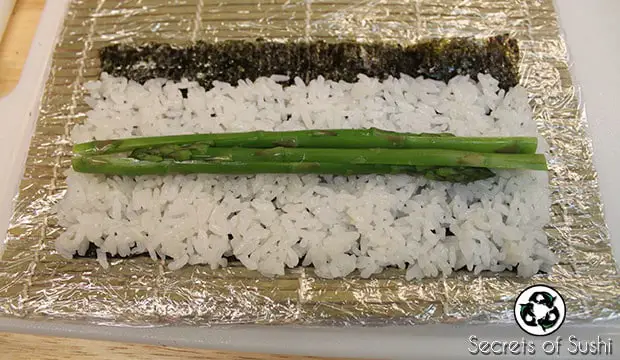
    Asparagus roll step 3

    When I was making this tutorial, I made the mistake of cutting my asparagus too short! As you can see above, the pieces are about an inch (2.5cm) too short. Don’t do this at home! You can use a piece of nori to measure how long to cut your asparagus.

    4. Now comes the difficult part: You have to roll it up before the nori becomes soggy… the nori needs to be wet in order to stick to itself!

    Dip your fingers into your bowl of water and transfer that water to the exposed portion of the nori. While the nori is wet, slide your thumbs underneath the makisu (bamboo rolling mat) and roll it over the asparagus. You can use your fingers to hold the ingredients in place while you roll.
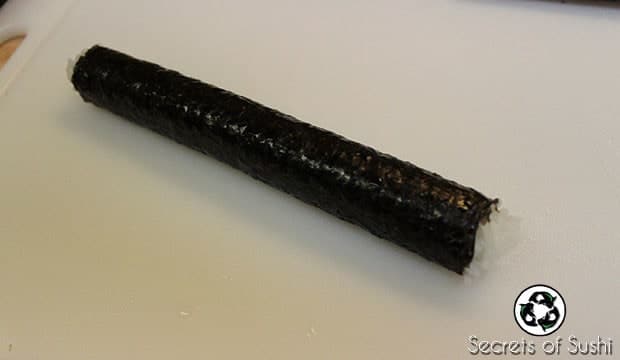
    Asparagus Roll Hosomaki

    Once you have rolled it up, let it sit (with the wet portion facing down) for a minute or two.

    5. While you wait, you can use the makisu to “tuck the ends.” Place the makisu over one end the roll and apply very light pressure with one hand. Use 1-2 fingers (on your other hand) to push any rice and/or ingredients back into your roll.
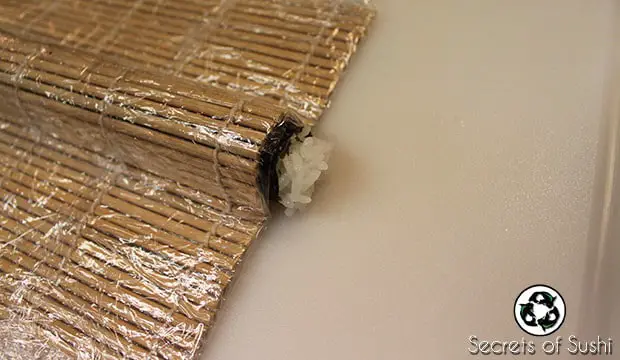
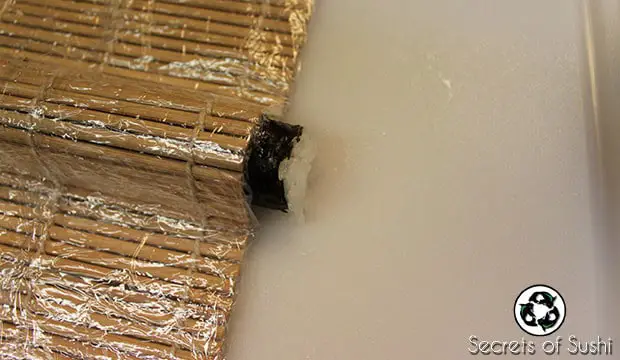
    Asparagus roll- tucking the ends 1
    Asparagus roll- tucking the ends 2

    That should help make your end pieces look much cleaner.

    6. Now that the wet nori has had some time to dry and adhere to itself, it’s time to cut! Slice the roll in half and stack the two halves together.
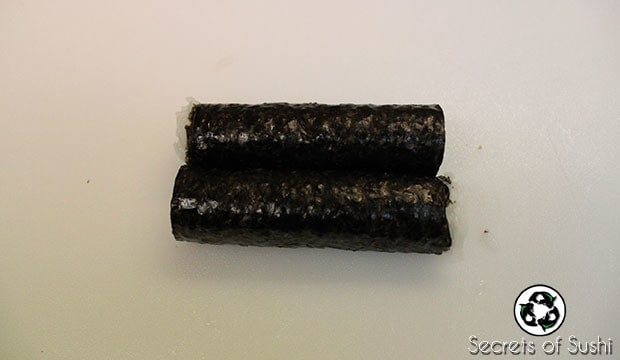
    hosomaki cut in half

    Then, slices the two halves into thirds:
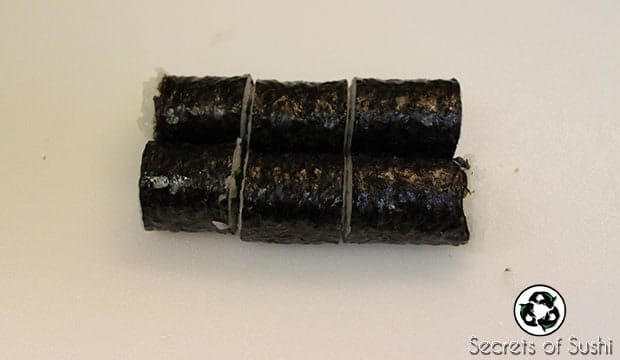
    sliced hosomaki

    7. Finally, tip the four end pieces on their side and place the roll on a plate. You can add wasabi, ginger, and/or some garnishes to go with the roll as well!
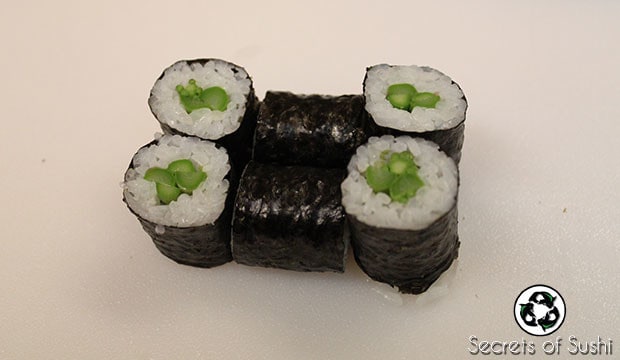
    Cut asparagus roll

    Pro Tip:

    I like to add a little Garlic MayoMiso Mayo to my asparagus roll! It adds a nice layer of flavor on top the simple roll.

    Happy Sushi Rolling!

    The asparagus roll is a fantastic way to enjoy homemade sushi with minimal effort while still achieving maximum flavor. Whether you’re a beginner looking to practice your rolling technique or a seasoned home chef seeking a delicious appetizer to impress your guests, this roll is a simple yet elegant choice. The combination of fresh asparagus spears, sushi rice, and nori creates a perfectly balanced bite—light, crisp, and packed with flavor.

    Plus, this sushi recipe is incredibly versatile. Serve it alongside other sushi favorites, pair it with a side of soy sauce, or add extra ingredients like avocado, cream cheese, or a sprinkle of sesame seeds for even more texture and taste. Best of all, it’s a great option for vegetarians and vegans who want a healthy, plant-based sushi alternative.

    Now that you have all the steps and tips to make your own asparagus roll, it’s time to put your skills to the test! Gather your ingredients, roll with confidence, and enjoy the fresh, delicious flavors of homemade sushi. If you liked this tutorial, share it with a friend on social media! It would mean the world to me if you did. 🙂

    I hope you enjoyed this recipe. As always, if you have any questions feel free to leave them in the comments box or shoot me an email: bryan (at) secretsofsushi.com

    If you liked this recipe and would like to try a more challenging one, try out the Dark Side Roll!

    Share:

    Bryan Sekine with Secrets of Sushi

    Bryan Sekine

    I’ve been a professional sushi chef since 2008, but my passion is in teaching others. I have taught over 300 people in my live sushi classes and countless others online!

    My goal is to teach people how to make sushi at home while educating them about sustainable seafood practices.

    Related Posts

    Onigiri 1

    Onigiri

    At first glance, Onigiri (also known as O-musubi, or rice ball) looks like a type of sushi. But there are a few, key differences, that

    Read More »

    Flying Fish Roe

    “What are these little orange balls on my sushi?” “It’s flying fish roe!” I would always say. These little balls are also known as tobiko.

    Read More »

    Sign up for my email list

    The Essential Equipment to Make Sushi at Home cover image

    100% Privacy Guaranteed! (I hate spam just as much as you do)

    DOWNLOAD MY FREE GUIDE

    The Essential Equipment to Make Sushi at Home

    Subscription Form

    Sign up for my email list

    The Essential Equipment to Make Sushi at Home cover image

    100% Privacy Guaranteed! (I hate spam just as much as you do)

    DOWNLOAD MY FREE GUIDE

    The Essential Equipment to Make Sushi at Home

    Subscription Form
    The Essential Equipment to Make Sushi at Home cover image

    Download my Free Guide

    Download my free guide and sign up for my email list! I only send helpful sushi tips that you won’t find anywhere else on my site. 

    Subscription Form