The ability to pack sushi for lunch is a wonderful idea.
Most of the time, when I talk about eating sushi for lunch, my friends assume that I’m talking going out to a sushi restaurant – but I’m actually talking about packing sushi for lunch.
In this tutorial, I’m going to show you how to do just that. But before we get into the steps of this tutorial, I need to explain a few things. It’s important that you understand these topics before diving head-first into packing sushi for lunch.
**Food Safety Disclaimer** I am not a licensed physician, doctor, or any other medical adviser. While the information in this article is intended to educational, I take no responsibility for your personal health. It is very important that you understand the FDA guidelines for food safety and are diligent about implementing them.
**Personal Disclaimer** Everything that I talk about in this article has been tested on myself numerous times. I would never recommend something that I have not tried, myself. While you do need to be careful about how you handle your food, please do not let this scare you into not trying it.
The topics include:
- Why You Shouldn’t Pre-make Sushi
- Reusing Rice & Why it Shouldn’t be Refrigerated
- Understanding the Temaki Technique
- Equipment I Use
- Ingredients (for use with a refrigerator and without)
Here’s where things get interesting though: the sushi can NOT be pre-made.
Why You Shouldn’t Pre-make Sushi
Pre-making sushi has a lot of disadvantages…
- The rice loses flavor when it cools down and becomes rock-hard when refrigerated.
- The nori starts to soften after 15-20 minutes and becomes soggy after 30 (or if you put it in the refrigerator).
- Raw fish can NOT be left at room temperature for more than 3 hours (the FDA says 4 hours, but I like to be safe)
- Any kind of sauce needs to be in a separate container, otherwise it will soak into the rice and make the sushi soggy.
With that in mind, let’s talk about how we can pack sushi for lunch without seeing any of those disadvantages – starting with the rice.
Reusing Rice & Why it Doesn’t Need to be Refrigerated / Shouldn’t be Refrigerated
If you stop and think about it, sushi rice is seasoned with three of the worlds oldest, natural preservatives; vinegar, sugar, and salt.
Each ingredient has been used by numerous cultures (either individually or in combination) to preserve food. These techniques existed long before refrigeration and were perfectly sanitary practices if done correctly.
In fact, the earliest forms of sushi existed not as a culinary dish, but as a method of transporting raw fish across great distances (they packaged the raw fish in pickled rice! Bleh.).
So it should comes as no surprise that properly seasoned sushi rice doesn’t need to be refrigerated.
In fact, I recommend that you don’t refrigerate your sushi rice.
There are a few things that are important to know about using food that isn’t refrigerated:
- You need to be careful with this. Cooked, unseasoned rice is more likely to host bacterial growth than raw fish. I never use rice that is more than a day old (though, I have tested rice that was three days old and I didn’t get sick) – it’s always better to be on the safe side.
- It needs to be in a sealed container until you’re ready to use it. This might seem like common sense, but its important that you keep the container sealed as often as possible. The more the rice container is opened, the more likely it is that bacteria will make its way in and start growing.
- It will taste different than freshly cooked rice. The best sushi rice will be always be freshly prepared rice – no doubt about that. The high temperature of the rice is great for fusing the rice wine vinegar with each grain. While eating room temperature rice is still good, the flavor will be slightly different (about as different as eating cold pizza instead of hot pizza).
Pack Sushi for Lunch: Understanding the Temaki Technique
The word temaki literally translates to “hand roll,” which is a great description for the type of rolls we will be making. We will be rolling this using just our hands (and eating it with our hands, too).
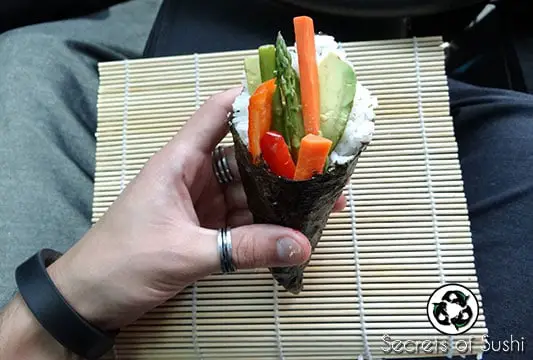
As you can see, the temaki looks a lot like an ice cream cone. When a lot of my guests at the sushi bar initially see this, they think, “How am I supposed to eat this?!” Don’t worry – if you can eat a burrito, then you can eat temaki sushi.
The idea behind using this technique is to reduce the amount of equipment that is needed in order to pack sushi for lunch. Using this technique, it is unnecessary to bring a cutting board, knife, or a rolling mat (makisu).
For this technique, all you will need is:
- A small container of water (I used a water bottle that I had previously cut in half)
- A flat surface to work on (in the pictures, I used a cheap makisu to function as my flat, work surface)
- Containers for your ingredients (I’ll talk more about this later in the post)
- An air-tight bag to keep your nori in (zip-locked bags or freezer bags work great for this)
- Washcloth or small towel
Okay! Now that we have all of that out of the way, let’s get to rolling.
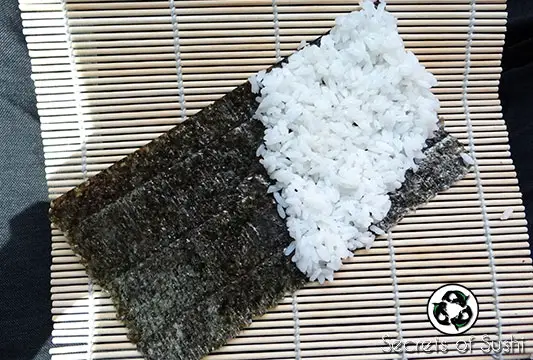
1. Apply your seasoned sushi rice to corner of the nori. You want to make the rice approximately 1cm thick and spread it into the shape of a kite. It’s perfectly acceptable to leave a small triangle of nori exposed on one side of the rice kite, as it will be rolled in with the rest of the nori.
2. Apply your ingredients along the center line of the rice, like so:
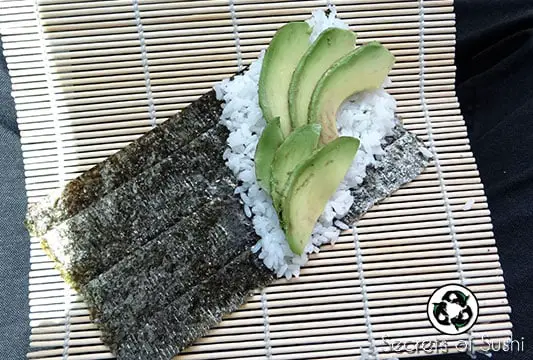
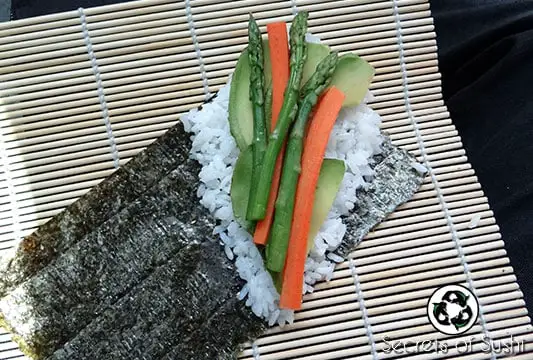
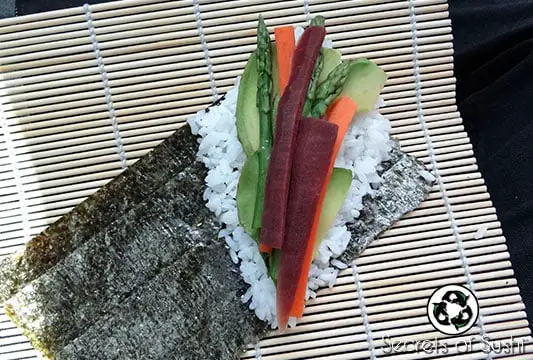
I bought some organic carrots at Sprouts and some of them were purple! Does anyone know what kind of carrots these are?

Don’t be afraid to really pack the ingredients on there. Since we aren’t rolling a standard sushi roll, we won’t need to be concerned with the amount of our “filler ingredients.”
3. Dip your fingers into the small container of water and get the majority of the end of the nori wet (you may need to use a lot of water). The idea here is to get the nori a little soggy so that it will stick to itself when we roll it up.
4. Immediately after getting the nori wet, you will want to start rolling it up. You won’t have much time to do this before the nori either becomes too soggy or starts to harden/dry.
Slide the nori into your non-dominant hand and use the other hand to wrap the wet portion of the nori around the opposite side. Use the rice as a guide and wrap the nori into cone.
5. Hold the wet nori in place and gently rotate the temaki in your hand to smooth everything out and stabilize the shape. You may need to set the temaki down on your flat surface to dry before eating.
Here’s a video of the technique:
P.s. I have a tiny car so it was a bit awkward working with limited space. If you have a break room to roll your sushi in, that would probably work better!
Equipment I Use to Pack Sushi for Lunch
You can use any kind of containers and lunch box combination that you want, but I highly recommend the Easy Lunch Boxes. I also use their Easy Lunch Bag Cooler – which is really handy because everything fits perfectly together.

My favorite part about these lunch boxes is the separate compartments. While they aren’t water tight (in the event that you’re making a seafood salad to take with you for lunch), they do work well for keeping your ingredients from mixing together.
Using just two of the Easy Lunch Boxes, I can pack enough ingredients to make 6 temaki sushi! That’s easily enough to feed two people. If it’s just you eating, then simply pack less ingredients and you’ll be just fine.
Other equipment you will need includes:
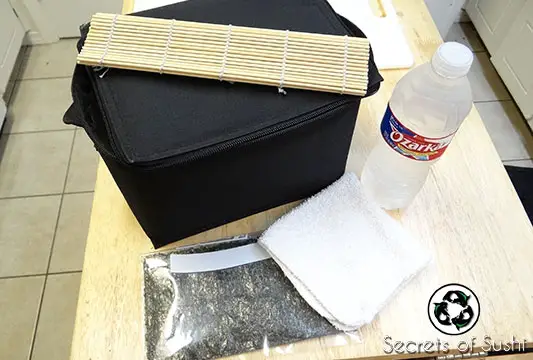
- A small container of water (I used a water bottle that I had previously cut in half)
- A flat surface to work on (in the pictures, I used a cheap makisu to function as my flat, work surface)
- An air-tight bag to keep your nori in (zip-locked bags or freezer bags work great for this)
- Washcloth or small towel
- A bottle of water (to pour into your small container and also to wash down that delicious sushi!)
To make life easier for you, here are the links to buy these amazing little lunch boxes from Amazon!
[one_fourth][/one_fourth]
[one_fourth][/one_fourth]
[one_fourth][/one_fourth]
[one_fourth_last][/one_fourth_last]
[clear]
Ingredients
The ingredients you use will be determined by whether or not you have access to a refrigerator. If you do, then the world is your oyster and you can use any conventional sushi ingredient that you please. If not, then I would highly recommend sticking an ice pack in your lunch box and avoid using seafood.
According to the Food and Drug Administration (which may be different if you’re outside of the U.S.), all cooked food should not fall into room temperature for more than 2 hours.
To be more specific, cooked food should stay above 140°F (60°C) and below 40°F (4°C).
Now, if you’ve been in the food industry for a while (like I have), that might come as a surprise to you. That’s because the FDA has recently become from conservative with food safety and switched the time frame from the previous 4 hours at room temperature to 2 hours.
That being said, I have enjoyed vegetarian sushi for lunch a few times and have never gotten sick. However, for legal purposes, I must insist that you take caution when trying this at home. If you believe that your food has gotten above 40°F (4°C) for more than 2 hours, then please throw it away. You might consider putting a thermometer in your lunch box to be sure that you’re within a safe temperature range.
Ingredients you can use with access to a refrigerator include:
- Cooked Shellfish
- Raw fish
- Raw or Cooked vegetables
- Pickled vegetables
- Deep fried ingredients
- Ingredients containing dairy (spicy mayo, spicy crab salad, etc)
Ingredients that you can use without access to a refrigerator include:
- Cooked vegetables
- Raw vegetables
- Cooked shrimp
- Pickled vegetables
- Deep fried ingredients (though these won’t taste nearly as good as when they are still warm)
As far as ingredients go, you can be very creative and even create your own recipes! The only real ingredients I would avoid if you don’t have access to a refrigerator are dairy products and raw seafood. Everything else is free game!
If you would like to bring a sauce to dip your temaki in, I recommend getting the small, sauce container that I listed above. You want to make sure that the sauce stay separate from all of the other ingredients to avoid getting anything soggy.
Remember: have fun and be creative! As long as you follow the temperature guidelines to make sure you’re being safe, then you should have no problem packing sushi for lunch.
If you have any questions, comments, or concerns, drop me a line in the comments sections below.
Enjoy!
Bryan Sekine


